![]()
Adrian's Tips
Two Up is an Australian gambling game where 2 coins are tossed in the air, and bets placed on how they land, heads up or tails up, with both coins the same way up.
It is a handy way of remembering that when checking your ailerons, stand behind the model and ensure that the aileron that you move the stick TO is the one that goes UP!
This one saved me recently (again) just before a maiden flight. I have seen reversed ailerons too many times, and this is a simple check for maiden flights, or after equipment changes or repairs.
Pass it on!
Learners & P Platers!
Following are my thoughts for newbies to observe during their first year or so of flying......
Sustained concentration can be a problem early in learning, so don't hesitate to hand the transmitter to your teacher or helper for a break.
Try and fly up-wind of yourself, especially with gliders.
Try and fly with the sun behind you so that the plane is well lit to avoid disorientation.
Fly as slowly as you safely can without risking stalling.
When flying towards yourself, move the stick towards the low wing to level them.
Fly high enough to allow for mistakes, but low enough to see clearly what your plane is doing.
Start to try and plan where you will be flying in a few seconds....ie, stay ahead of the aircraft, don't just follow it.
I'll add more tips as they come to mind, but remember, keep it fun! If you stop having fun, think back to what might have happened to change your feelings, and make the changes that might be needed.
NiMh Battery Caution
This is on the Spectrum website..... 7 Nov 2007
Ni-MH Battery Charging Cautions bulletin
The latest generation of Nickel Metal Hydride batteries incorporates a new chemistry mandated to be more environmentally friendly. These batteries, when charged with peak detection fast chargers, have tendencies to repeatedly false peak (not fully charge). These include all brands of NiMh batteries. If using NiMh packs be especially cautious when charging making absolutely sure that the battery is fully charged. It is recommended to use a charger that can display total charge current. Note the number of mAh put into a discharged pack to verify it has been charged to capacity.
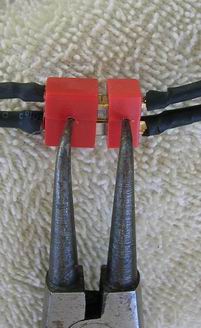
Does separating the Deans connectors give you grief after an electric flight? This is not my idea, but it works well.
Just drill a 1.5mm hole in your battery and aircraft's connectors and use a circlip expander or round nose pliers to help prevent damage to your plane!
Oily Balsa
In looking for ways to remove oil from balsa etc that accummulates over time, several modellers suggested that a cleaner called Kr2 did a really good job.
Surprisingly, after a brief search, I found it is available in Oz, then after visiting their site at www.k2r.com.au I saw that it was supposed to be available at Woolies.
A search at the Berri store drew a blank, but I found it in a small can at the Renmark store in the cleaning aisle! It is $11.00, and it really works. You may need to process deep problems with several applications. You will also see a note at their site mentioning modellers using it.
Follow the instructions, but I just spray it on and wait until it dries leaving a white powder. Brush the powder off and re-apply if you think glue will not take to it.Spektrum DX6i Battery Mod
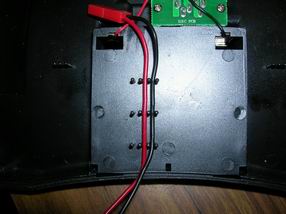
I have been using alkalines (holder takes 4 AA cells) in my DX6i, but I note that lately I have been leaving the tx switched on after removing the aircraft battery and then talking etc. and it was starting to cost for batteries. A timer/alarm for no stick movement after a few minutes would be handy. So I tried using Nimhs, but they did not have enough voltage to last very long before falling to the low voltage reference bar. So in a mad fit of inspiration, I measured and found that 5 AAA nimh cells will fit in the battery receptacle! I have made a 5 cell pack with JST connector, and soldered the JST socket to the existing tabs. Now I can use my rechargeable pack and top it up thru the day, or just fit alkalines in emergencies. I only just did the mod so I can't give a long term report, but the Tx voltage indicator is now nearly full after charging, and indicates 6.8V.
I also made a short cable adaptor with a tx charge plug one end and a servo plug on the other which plugs into a wall wart charger's receiver connector.
Of course it will be simple to charge off a field charger too.
Rear view of the battery compartment. The JST wires are secured in the existing pins, and loop around to the corresponding battery tabs. This way the nimh pack can be removed and alkalines used if required.
FOOTNOTE......Dec 2009
I have since removed the NiMh pack because a strange fault eveloped after using it for about 6 months. I doubt that it is a voltage problem, but my Tx has started shutting down while flying! Then it wouldn't switch on at all. It only did it with my Micro Su26, so apart from some slightly buckled foam, no harm was done. Subsequent inspection showed that it was ok with the back off the tx, but was faulty with the back in place. I strongly suspect that the extra wire being pushed back into the Tx was putting pressure on a component on a circuit board, which didn't like it. It has since started up faultlesly since I removed the NiMh pack.
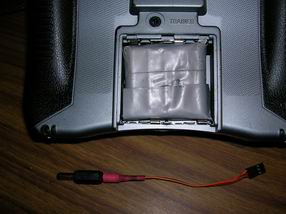
Here is the pack installed. The JST connector has been pushed through the hole into unused space low in the tx.Also pictured is the charging adaptor. The normal JR/Spektrum charger can not be used as it is intended for 8 cells, so I made an adaptor to allow the tx to charge from the receiver charge lead. OBSERVE POLARITY! I will use it like this for a while with suitable models, and if it proves ok, I will put the NiMh's back in it, but taking care to keep any extra wiring away from the other circuit boards. So if you are planning to fit NiMh's like me, just ensure that any added wiring is clear of the other Tx works!
Final Entry.......Jan 4 2010
Problem solved, but I have left the foregoing info for reference.
When flying a few days ago, I tried the DX6i again, and blow me down if it wasn't dead at the field! It was a warm day so my buddy suggested that we put the transmitter in a cooler. Sure enough, after a while it would boot again. So I figured that it should go in for service. Later, I wondered if I had overlooked something, and maybe I should check out some basics. After all, I had looked after the technical side of a few radio stations for the odd decade or so. A quick check with a multimeter wouldn't hurt before sending it off. It was in fault condition, so I did what I should have done earlier.....I looked for the voltage where the battery wires plugged ino a Tx board. No volts. Back at the battery holder there was 6v. Hmmm. Only a red and a black wire to check. I was puzzled to find that the positive (red) wire seemed to be open circuit. Pulling on it from both ends showed that the wire seemed to be soldered ok. Even stranger.So I pulled harder, and the wire came away......it had never been soldered properly and was being held by some melted plastic from the battery holder, giving the impression of being soldered, but the wire was only just touching the terminal that it was meant for. Obviously, it was close enough to contact intermittently, varying with temperature. So I was the cause, by trying to solder in a dark area, surrounded by plack plastic, and thinking that it had joined properly when in fact, the iron had got too close to the frame, and melted some plastic which then gripped the insulation on the red wire, letting me think that it was firmly soldered. This came about because I was trying to keep the ability of using both battery supplies.As a solution, I removed the wiring from the battery holder and soldered them to the NiMh battery pack thru a mini Deans connector. A much more reliable method. Since the fix, I have twice left the tx in the car with the windows up to get it hot. And each time it booted up fine! End of saga.....Phew!
Micro PZ SU26 Tip....
There are lots of good tips to enjoy these beasties more, and one of them is to use GWS 5030 or 5042 props. A problem is that these props have a bigger hole in them, and won't fit tightly to the shaft. I heard that GWS make adaptors, but a quick & easy solution is to NOT discard your broken PZ props! The hole in them is already threaded for the SU26 shaft, and all you need to do is trim off the blade stubs and the plastic that remains with the shaft hole in it is a tight fit in the GWS prop! Lightly glue it if you file too much off. Handy eh?!
My first mid-air